The Last Judge of Hollow Knight Silksong: How to Take Down the Boss at the Citadel’s Entrance
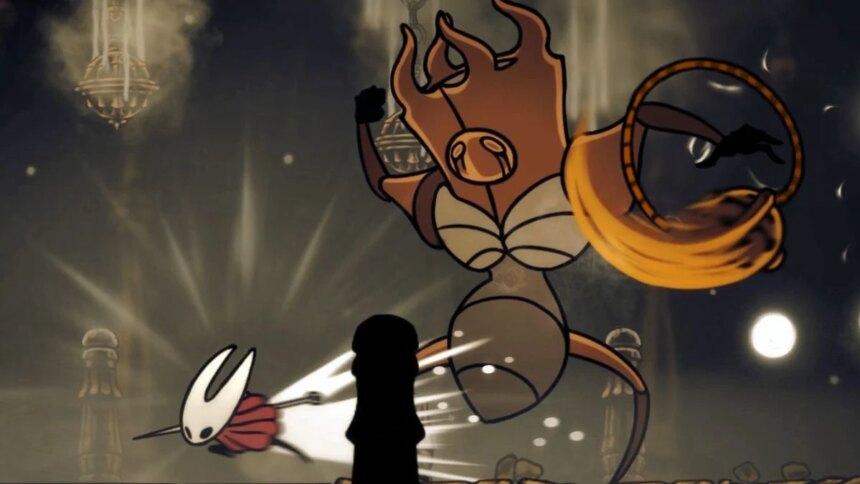
Just when Hornet thought it was safe to ring the bells and waltz through the grand portal in Silksong, another boss comes crashing in like an uninvited party crasher. Meet The Last Judge! Buckle up for a thrilling video fight, alongside a delightful guide filled with tips and tricks to help those brave enough to face this formidable foe.
Entering the Citadel might sound like a walk in the park, but, spoiler alert: it’s much more of a walk through a haunted house where the ghosts actually want to eat you. Even after the sound of bells fades, The Last Judge appears with all the subtlety of a marching band at a funeral. If confronting her seems like a bad idea, there’s always the backdoor option through The Mists after dealing with the Phantom. But before panic ensues, let’s dive into some useful strategies for this arduous battle.
Preparation for Facing The Last Judge in Hollow Knight Silksong
- Double down on gathering as many Mask Fragments and Bobbins as possible; go on, get greedy! Also, maxing out a charm like the Enhanced Reaper Emblem can transform that boss from formidable to slightly less terrifying.
- The Magma Bell Tool—available from the Blacksmith—will be your best friend in the second phase, reducing fire damage like it’s throwing a wet blanket on a campfire.
- Offensive tools like the Mortaille and the Steel Spikes might sound like something out of a horror film, but they are incredibly effective! Just make sure to master the timing before going in; the last thing needed is to accidentally hug a spike.
The Battle with The Last Judge
The real kicker in this battle is the boss’s extensive repertoire of attacks, and they come out faster than a kid on Halloween. Responding incorrectly could lead to a swift and untimely end—think of it as a fun game where a single mistake equals a trip to the game over screen. Getting hit by one attack, only to be barreled over by another, is about as likely as a cat ignoring a laser pointer. The end result? Losing all health in mere seconds. Sounds fun, right?
Phase 1
- Swirling Incense: This attack is about as pleasant as a fire drill at a spa retreat—apologies to reflexes, but they will definitely be tested. Unless reflexes are on par with a ninja, it’s wiser to sneak in one or two melee attacks and run for the hills, predicting when she’ll deploy this tactic.
- Ranged Attack: The boss uses her Incense like a flail, making it a surprise guest even when she’s not on screen. It tends to strike when the ‘hero’ attempts to make a hasty retreat. The best strategy is to stay close and counterattack when she uses it, then leap to dodge the incoming attack—although fleeing before things get too hairy is often the best survival tactic.
- Jump: This attack is the baby of the group—least dangerous and easiest to avoid. Once the jump’s reach is figured out, simply wait near the landing zone and shower the boss with hits!
Phase 2
The boss is all fired up this time, roaring with gusto while her incense lights up like a Fourth of July celebration. If close enough, it’s a perfect chance to slug away at her until she wakes up to reality—but don’t get too cozy! She starts this phase with a powered-up whirlwind that gives anyone caught in it a scorching makeover.
- Fiery Whirlwind: The base of this attack doesn’t change, but it now sends waves of flames dancing around the arena like they’re auditioning for a fire show. The best defense is a good distance—about a screen’s length—to make dodging those waves much easier.
- Explosive Ranged Attack: Stay at least five feet away, or risk being turned into a pancake. Once the projectile hits the ground, things can get ‘boom’-y real quick!
- Fiery Jump: This jump is still often used, but it’s the least dangerous move. When it strikes the ground, take a hint and leap to avoid the flames, giving a golden opportunity for aerial attacks. Just don’t get overzealous!
- Fiery Charge: This new attack is rather annoying. The boss crouches and charges across the floor like she’s late for a meeting. After a few moments, fiery columns rise from the ground—it’s like the floor is lava, except it’s real! Jump over the boss then slip between the columns, or make a hasty retreat if there’s ample distance. Still, predicting that mid-chaos might prove exceptionally challenging.
Phase 3
Don’t worry; the boss will play her catchy intro animation again, but this time she’ll leap right into a supercharged fiery whirlwind. It’s longer, it’s more dangerous, and it’s just as breathtaking as watching a car wreck.
Stepping back while the flames roll in is key to avoiding the mess, and doing so keeps the back foot off the wall. When the whirlwind subsides, the boss will be a little woozy—perfect timing for a finishing blow.
Beyond that, this phase isn’t all that different from the second. So, the moment to unleash the tools and put an end to this fiery escapade has arrived!