Unlocking the Surgeon Key in Hollow Knight: Silksong
Ready for some brain-bending fun? Buckle up, because navigating the whimsically dangerous world of Hollow Knight: Silksong is about to turn into a treasure hunt. Amongst all the hidden gems, one mystery stands out: the enigmatic Surgeon Key located in the delightful yet treacherous stretch known as the Whiteward. Let’s delve into how to find this elusive key and take on the boss known as The Unravelled—because who doesn’t want to unravel a good mystery?
Plenty can be said about the multitude of secrets lurking in Hollow Knight: Silksong. The Whiteward area, unlocked in act two, is a prime example of how to cram suspense into a pint-sized package. It may be small, but it oozes atmosphere and is home to a cheeky little ornate mechanism that could give anyone pause for thought. But don’t expect neon arrows pointing at the Surgeon Key—it’s as subtle as a ninja at a tea party.
Finding the Elusive Surgeon Key in Silksong
Ascending toward the Citadel means passing through Whiteward. The vital key to advancing the story—a shimmering white key discovered at Chantesoir—will facilitate an elevator ride but won’t do a lick of good for prying open that mysterious ornate contraption tucked beneath the Whiteward. For that, the likes of the Surgical Key are indispensable. But alas, the search begins by locating the Serrefil ability—commonly known as the grapple hook to people who prefer brevity—hiding out in the Foundry.
After obtaining this swanky new ability, it’s time to traipse back to Whiteward. Before hitting a lava pit that leads to Foundry’s underbelly (because, why not?), look overhead for a sneaky little hidden passage. It’s not a magic door to Narnia, but it’s close enough.
Inside a room, which no doubt has seen better days, an ornate ring hangs from a chain. Use that shiny new grapple hook to snag the Surgical Key—just don’t be surprised when the noise lures a foe, proving yet again that no good deed goes unpunished.
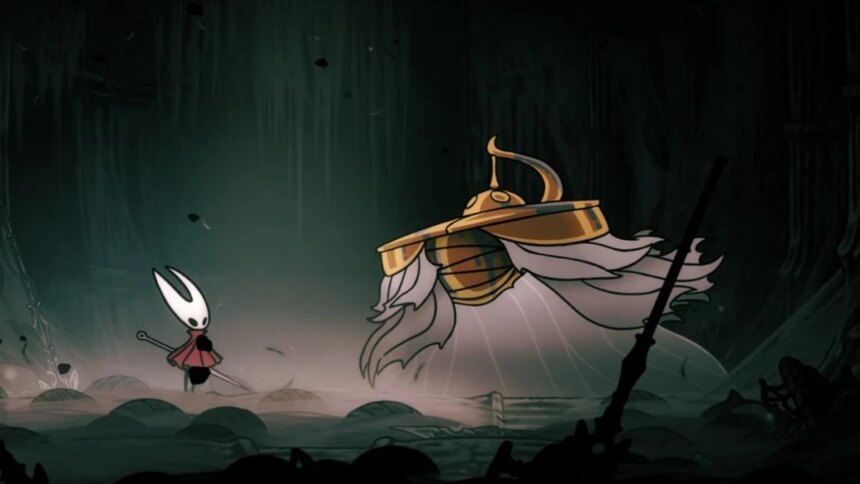
Take the key back to the mysterious ornate mechanism, and voilà! An arena opens up, allowing one to face off against the intimidating boss known as The Unravelled. Cheers all around!
Meeting The Unravelled: A Showdown to Remember
Oh, the thrill of battle! The encounter begins with a slow burn: an isolated enemy, then two more, like a shy magician pulling one too many rabbits from a hat before the headliner appears. The fight splits into two rounds, featuring four main attacks, plus a guest appearance from the enemy fan club. Each attack has its own herald of dust and fabric—it’s basically a fashion show gone awry.
- Charge: The boss dashes from one wall to the other like a toddler on a sugar high, slamming into the barrier. Phase two? Every collision shoots up a vertical lance because who doesn’t love adding obstacles?
- The Unravelled hurls two corpses (three in phase two). These can be deflected with some fancy needlework, but they still hold the “oops, I didn’t dodge” potential.
- Stun Protocol: When briefly dazed, the boss dives back into the ground, sending a wave of minions. The first daze kicks off phase two. How delightful!
- Spear Rain (phase two): Lances swoop in to target the last position of Hornet, “hailing” down in increments of three or four—because that’s how boss fights work, right?
- Invocation (phase two): Like a magician with new tricks, the boss springs up and summons two lances to rain, followed by a third later. It’s all about keeping players on their toes.
Each of The Unravelled’s hits snatches two masks’ worth of health. Master the art of jumping to dodge charges, smack him when he emerges from the ground, and don’t forget to utilize those minions for some sweet healing silk. The final phase? It’s like a chaotic dance party where each step risks stepping on toes. Keep some distance and wait for those crucial moments to strike.
Those shiny metal shoulders may look tough, but they double as a trampoline if played right. Bouncing off them can dodge those pesky ground assaults—at least they serve a purpose beyond just being eye candy!
Pro tip: The Steel Spikes are going to be your new best friends in this battle—at least they’ll be more amiable than the boss!
Defeating The Unravelled rewards players with a remarkably special treasure: a Silkheart. Think of it as the rare Pokémon of hearts—exceedingly rare and pretty nifty to have in the inventory. With three of these beauties available, players can automate their silk regeneration, with a bonus every three seconds. Each new heart expands the potential healing stock, while still following the “one chunk at a time” motto. It seems generosity isn’t the primary selling point of this game!